IF YOU NEED A SWEATER, I HAVE 167 OF THEM TO CHOOSE FROM AT THE SHOP FOR $5 EACH STARTING FRIDAY DECEMBER 2nd. Stop by and say hello!
I love the idea of making a stocking from an old sweater, but I have NO TIME to sew! If I have no time and I’m the craft lady on Mass Appeal, I’m quite certain you don’t have time either. Here is a short cut using a glue gun that will work just fine! There are many ways to do this craft, but I’ve found this way to be the fastest and cheapest. Cheap & Fast is best for my “working Mom” schedule! I started this craft at 8pm last night because my supplies shipment didn’t get here in time. In ONE HOUR I finished two stockings. Yeah! It worked!
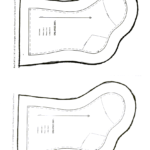
SWEATER PATTERNS
- Simple stocking pattern
- Advanced pattern
- Layout example
- Doggie Dog Templates for Decorating!
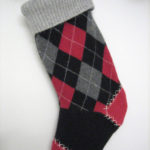
Here are a few stockings I found on the internet to show you what other people have done.
- Easy
- Cuffed
- Using front buttons
- Advanced
- Cuffed
- Advanced
EASY STOCKING
SUPPLIES
1 Sweater (Acrylic works well with glue guns because it melts easily. If you use a heavy knit it works better than a thin sweater like cashmere)
Glue gun & glue sticks
Iron on interfacing
Heavy fabric or felt (Any fabric will do. I used an old fleece blanket.)
*OPTIONAL: Buttons, rhinestones, sequins, fabric paint, glitter glue, etc
DIRECTIONS
(The video will be posted tomorrow afternoon and it will help you far better than my fly by night written instructions.)
STEP ONE
Cut one of the stocking pattern out of the blanket material. Cut it slightly bigger than the pattern by 1 inch.
Take the cut blanket piece and cut one piece the same size from the interfacing. You will now have 3 pieces.
STEP TWO
Put the sweater inside out and lay it flat. Put the stocking pattern over the sweater and cut both layers so you have 2 pieces.
STEP THREE
Lay the interfacing over one side of the blanket material and iron it on. Then place the sweater stocking over the interfacing side and glue around the edges with a glue gun, pushing the sweater down into the glue as you go. DO NOT GLUE THE TOP EDGE, just go around the sides and bottom.
STEP FOUR
Glue the other sweater piece with the front facing down on to the other sweater piece. Both sweater pieces should be facing each other with the front sides inward. Push the sweater into the glue as you go.
STEP FIVE
Cut the excess fabric away from the sides. Cut the seams so the curves will stretch easily. Turn inside out. Turn the top edges inward and glue down.
STEP SIX
If you want a cuff, you can cut 2 pieces from the sleeves 1 inch longer than the stocking pattern. Then glue one end. Use a small piece of blanket fabric and glue a strip on the side seam so it doesn’t stretch. Glue the top and bottom together so it looks like a tube. Pull it inside out. Glue to the top of the stocking. Then take the end and push it inside the the other end, fold it over and glue.
STEP SEVEN
Cut the neck part of the sweater but cut one inch larger so you will have enough fabric to fold it over. DO NOT CUT THE EDGES. It should look like a circle when you are done. Then glue the edges under so you can’t see a seam. Fold the neck piece in half and glue to the top inside seam of the stocking. This will create a loop for you to hand your stocking.
DECORATE!
Add some rhinestones or flatback pearls and lace for a professional look! I added a fur cuff on one of my stockings. Feel free to come by the store or email me and I’ll be happy to share my fur scraps with you. You can find MANY ideas on my DIY Christmas Decor pinterest page. Here is the link!
LINED STOCKING (As seen on the show)
You can create a professional lined stocking the same way but you will need two pieces of blanket fabric and two pieces of sweater fabric. You will make two stockings, but the blanket stocking should be 1/2 inch smaller. Once both pieces are glued together, take the blanket stocking and place it inside the sweater stocking so the glued edges are facing each other. Turn the edges down on the sweater side and glue. Do the same thing with the lining, then glue both together.
HELPFUL HINTS
If you find the glue to be stiff, put a towel over the stocking and iron it. This will help the glue to melt and give the stocking a better shape. You can also use STITCH WITCHERY if you don’t like hot glue. It is more malleable but it isn’t as strong.
Happy crafting!
Malena
