Mermaid Necklace Tree
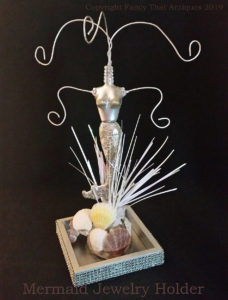
Mermaid Supplies (Total project cost as pictured $7)
Mermaid Doll 11″ (Dollar Tree)
Craft wire or metal hangers (DT) Craft wire will work for lightweight jewelry. Wire hangers are harder to bend but will hold up with heavier jewelry.
Wire cutters
Sea shells (DT) *Optional
Balloon weighted base (DT)
Diamond ribbon wrap (DT)
Glue gun and hot glue sticks
Spray paint
Wood dowel (DT)
Small wood wall hanging (DT)
Plastic beads with a large hole (DT)
Directions
- Remove the parts from the doll and from the wood wall hanging.
- Spray the doll parts, the wood box and the dowel lightly with metallic spray paint, allowing each side to dry for 30 minutes.
- Take your wire or metal hangers and cut them into pieces. You will need four 7″, four 12″ and one 18″ wire. The lengths don’t need to be exact. Spray paint the wires.
- Bend the wire into curly Qs on the ends.
- Use your glue gun to melt a small hold in the neck of the doll.
- Glue in 3 curled wires. Turn the doll upside down and pump more glue in.
- Take the long 18″ wire and thread it through the arm holes of the doll. Thread a bead through the wire and glue it to the arm hole.
- Twist the wire into a shape you like.
- Glue the dowel to the back of the mermaid tale. Allow it to dry for a few minutes. Attach the top and the tale together and glue in the center of the balloon weight.
- Glue the balloon weight into the center of the wood box.
- Decorate with old costume jewelry beads, glass pebbles or sea shells.
Ring Holder
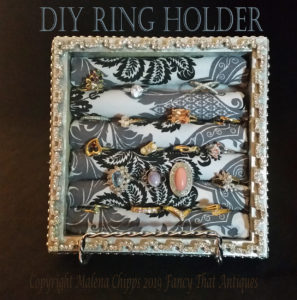
Ring Holder Supplies (Total project cost as pictured $4)
Foam curlers (Dollar Tree)
Small wood wall hanging (DT) OR cigar box or jewelry box. Any box will work fine!
Fabric (I used an old dish cloth)
Craft paint *Optional
Glue gun and hot glue sticks AND tacky glue
Picture holder (DT)
Directions
- Spray paint or craft paint the wood box. Allow to dry for 1 hour.
- Take the bendable foam rollers and cut them slightly smaller that the inside of the wood box.
- Cut fabric into pieces slightly longer than the rollers and wide enough to roll the fabric over each roller.
- Glue the edge of the fabric to the end of the roller. Roll the fabric covering the roller. Glue the ends into the inside of the roller.
- Hot glue the fabric covered roller into the inside of the box.
- Repeat leaving a tiny bit of room the width of a penny between each roller.
- Decorate the edges with ribbon or sparkly wrap.
- Hang on the wall or use a picture holder to put it on your dresser.
You will see on the video how to do this. These two crafts are super easy! The earring holder is just a picture frame with rubber shelf liner/rug backing glued to the back side. Very easy! Let me know if you liked it. I am on Mass Appeal the last Wednesday of the month. If you have a craft idea you want us to do on the show, email me and I will credit you. Happy crafting ladies!
Love,
Malena Chipps
