Regardless of how big or small your house is, you can never have too much space! This Tuesday on Mass Appeal I will show you how to make a professional looking makeup & nail polish organizer out of a cardboard box! I will also show you how to make a fabric covered basket WITH HANDLES from a cardboard box! These crafts are great projects to do with your kids because they require basic math skills. (Math and fun usually don’t go together.) By allowing the kids to choose the fabric, they will love to organize and decorate their room. My daughter and her friends loved the demos we made, and my baby is 22 years old! Each project costs less that $5 and most items can be found at the dollar store. I bought the Hermes style fabric at Wally World for $1 a yard. The vinyl damask was $2.97 a yard but because it was 62″ wide, I only needed one yard. The instructions are below but it will be soooo much easier to understand if you watch the show! A picture is worth a thousand words, right?
Makeup & Nail Polish Organizer
1 12x12x12 box
1 Large oblong vinyl tablecloth
Duct tape
Glue gun and hot glue sticks
3 Suction cup hooks
Ruler
Pen or Pencil
Box cutter or exacto blade
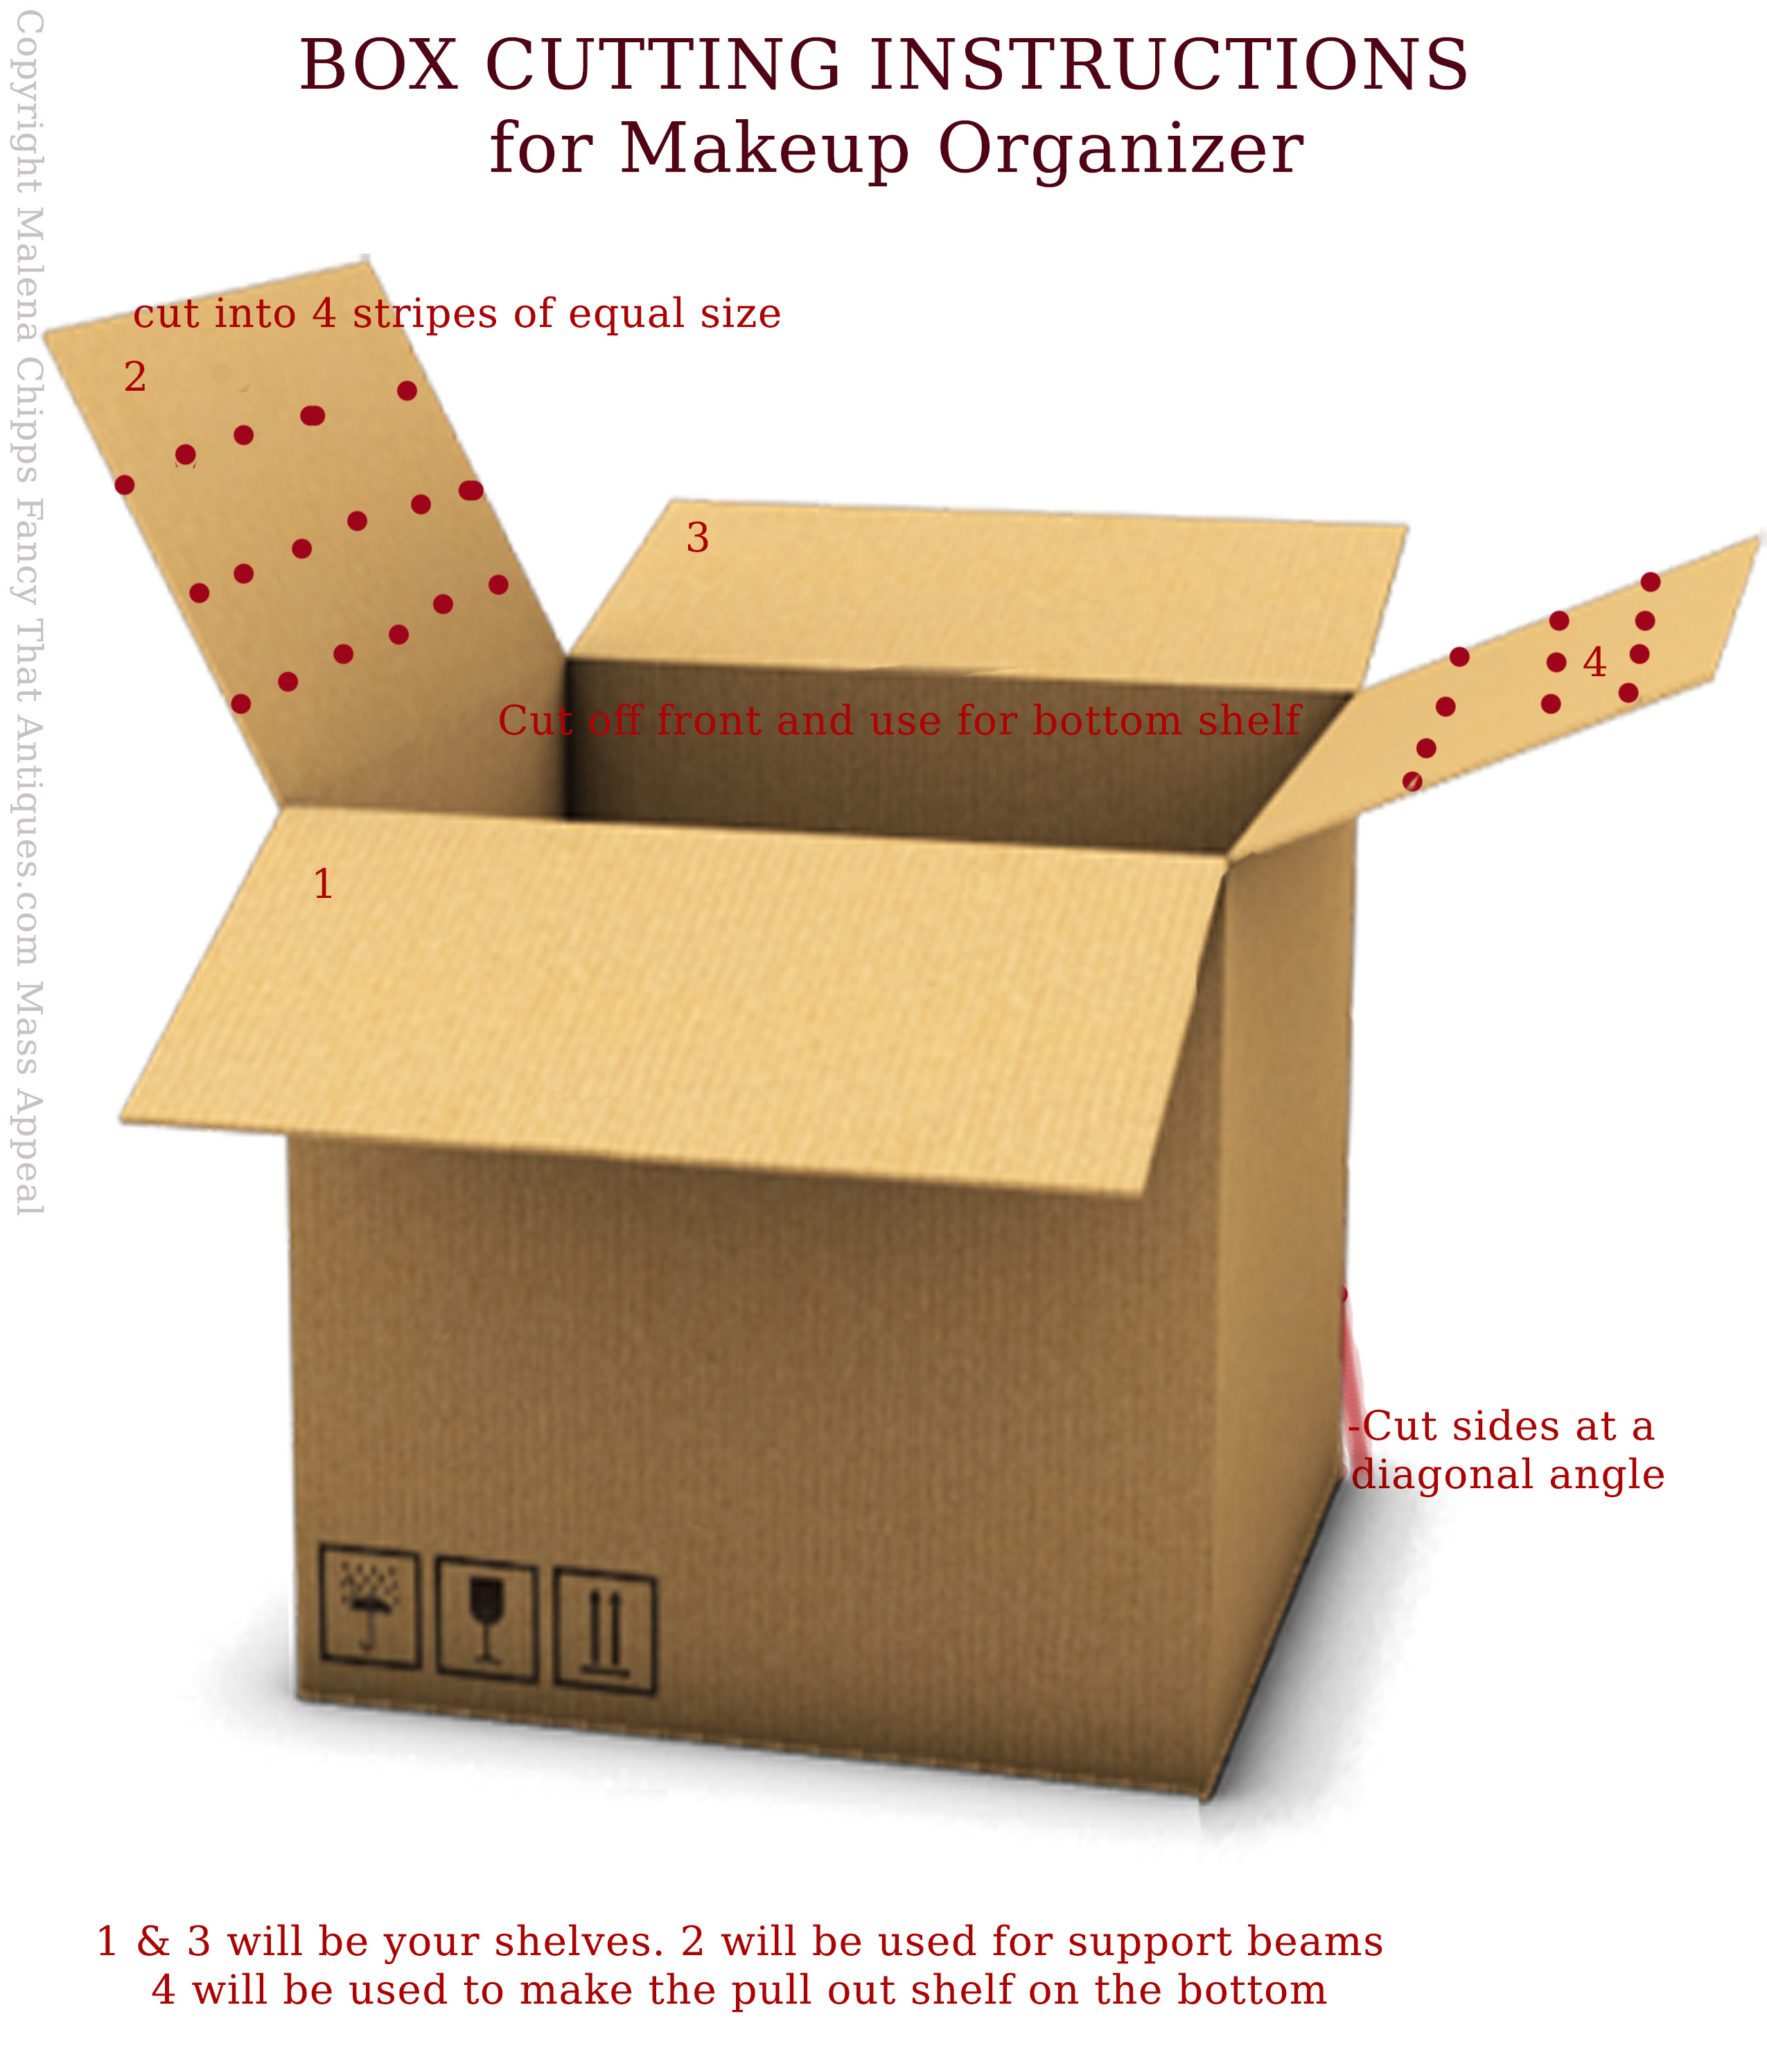
- Take a permanent marker and a ruler and trace a diagonal line from the top back to the bottom front on each side of the box.
- Cut sides along the marker line with an exacto blade.
- Cut the front of the box off and set aside.
- Reinforce all the seams inside and out with duct tape for added support.
- Cut sides #1 & #3 off at the top seam. One will be used as the shelf and the other will be used for the bottom drawer.
- Cut sides #2 & #4 into four equally sizes rectangular stripes. These will be used to support the shelf.
- Take your vinyl table cloth or contact paper and cut EIGHT 12 inch squares. One for the back, one for each side, one for the bottom. You will do the same on the inside.
- Start by gluing the first square on the bottom of the box. Then take the second square and glue in the inside bottom of the box.
- Glue a square on the back of the outside of the box and then the inside.
- Glue a square on the sides of the outside of the box. Then cut 1″ above the diagonal line. Fold over on the inside and glue. Do the other side the same way. Then glue a square on the inside of the sides, cutting 1/4″ below the diagonal line. This will ensure you don’t have any raw edges showing.
- Take the 8 rectangular stripes you cut from the side box tops and cover them with vinyl or contact paper. In an L shape, glue two stripes on each side to the back for support. Then glue one strip on each side of the box where you cut the diagonal line. You want your shelf to line up with the diagonal line so it is flushed.
- Cover #1 of the box top with vinyl or contact paper on both sides. Then place the shelf on top of the strips and glue around every edge on the top and bottom.
- Cut a 12×3″ piece of cardboard from the front piece of the box you set aside. Cut two 12×2″ stripes for the sides of the drawer. Cut two 3×2″ stripes for the ends. Glue into place and around the seams so it looks like a drawer. Reinforce with duct tape and cover with contact paper or vinyl.
- Cut two pieces of cardboard the same height and width as your 8 rectangular stripes. These can be glued into the center under the shelf for added support.
- You can glue suction cup hooks on the inside back for more storage if you like. The hot glue will melt the suction cup and the vinyl together for a firm bond.
I know this is a long drawn out how to, but if you watch the show you will find it to be very easy!

1 12x12x12 box
2 yards of fabric
Duct tape
Glue gun and hot glue sticks
Ruler
Pen or Pencil
Box cutter or exacto blade
Heavy rope
1 12×12 piece of plastic cutting sheet (optional)
Gold or Silver tacks (optional)
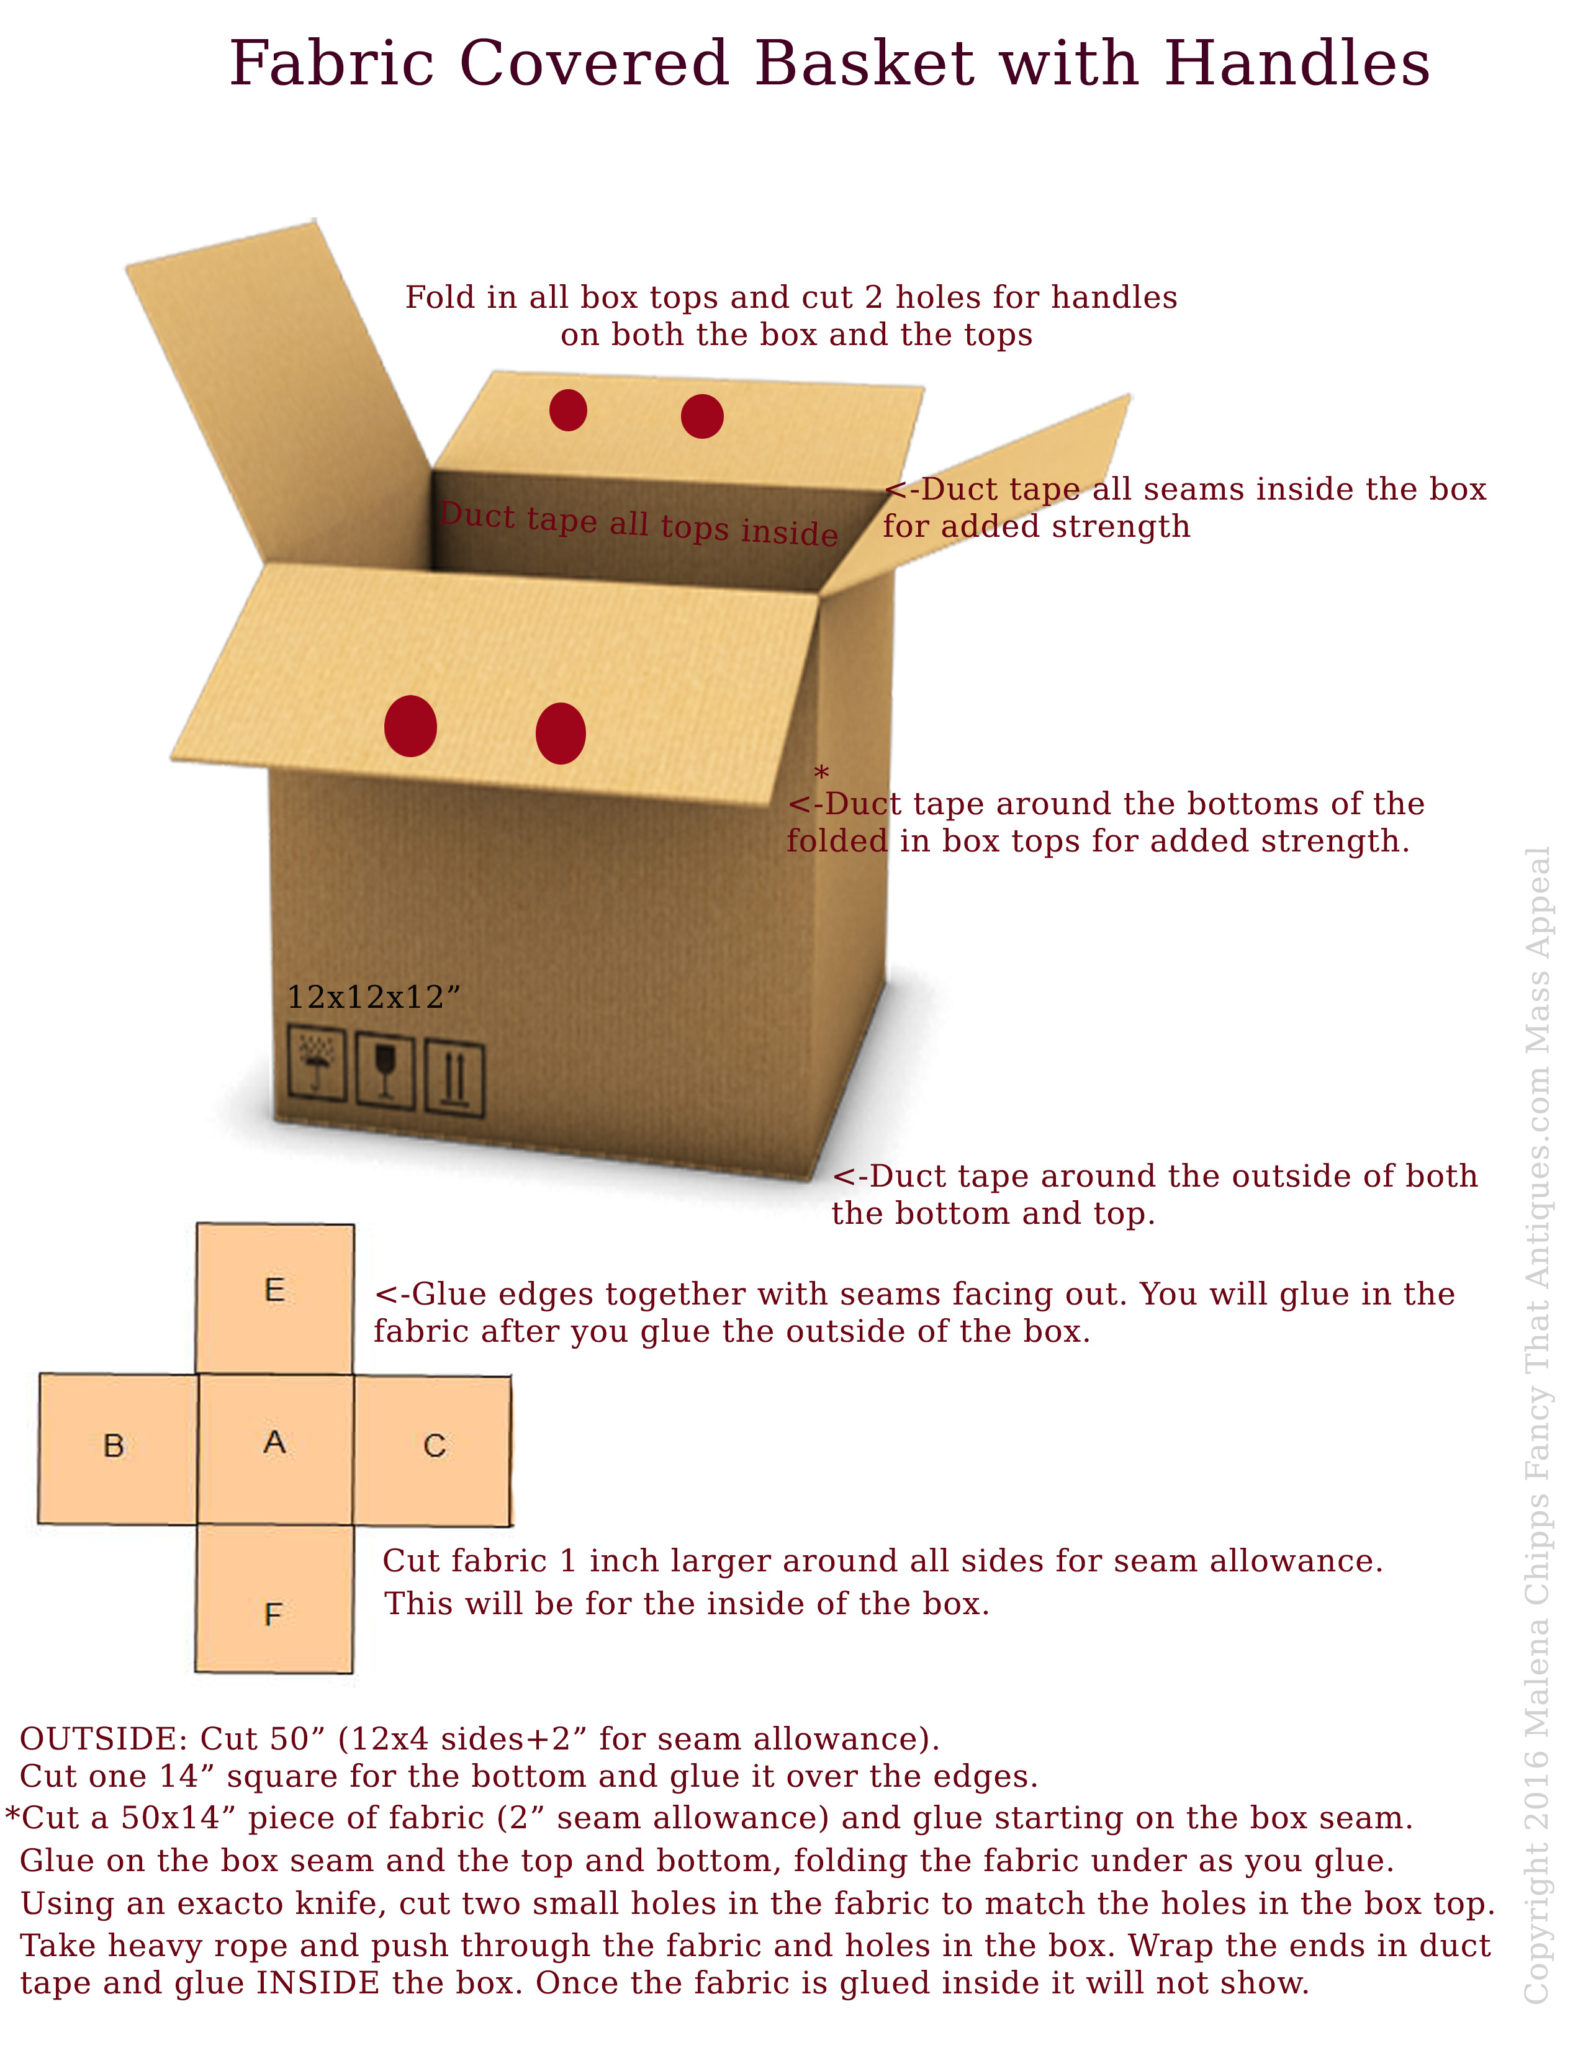
- First, fold in all the box tops inside the box and duct tape the edges. Then on two sides, cut a 1/2″ hole for the handles.
- Reinforce all the seams, top and bottom with duct tape so your box can handle large amounts of laundry, shoes, toys, etc.
- Using the box as your guide, cut a 14″ square out of fabric and glue around the edges of the bottom of the box. This will be 2 inches larger so you won’t have any duct tape showing.
- Cut a 50″ wide by 14″ piece of fabric. Starting at the * symbol on the picture shown, hot glue the fabric to the vertical seam then glue the top and bottom turning the fabric under as you glue. When you get to the front side where the 2 holes are, STOP and cut 2 small holes in the fabric with the exacto knife. These holes should line up with the holes in the box.
- Take a long piece of rope and measure to see how long you want your handles. Because you will have handles on both the inside and outside, you will want to double the length you choose and add 2 inches for the knots. Starting on the inside, thread the rope through to the outside and across to the other hole and back inside. Wrap duct tape around the two edges and glue them to the inside wall.
- Continue gluing the fabric around the entire box, repeating step #5 on the other side. Once you get to the starting point again, fold the fabric under and glue at the seam so there are no raw edges
- Place a 12×12″ plastic cutting sheet into the bottom and glue in. This is optional but it will help support the box. I do this in case water soaks through the fabric. You don’t want to have the water soak through the box! By gluing in something waterproof to the bottom, it will protect your cardboard. I bought mine at the dollar store of course.
- For the inside lining, use the A-F diagram above making each square is 13″ so you will have room to glue them together. With seams facing out, glue the squares together. Once all the seams are glued, place the fabric liner inside the box with the glued seams facing out. Glue the top edge and turn under as you glue.
- To keep the basket stain free, you can spray scotch guard on it if you wish. For added strength you can push little metal tacks around the edges of the bottom to keep everything in place OR glue on 4 large buttons on the bottom for feet to keep the fabric from touching the floor. I covered the bottom of my box with clear vinyl I bought from Wally World for $2.97 a yard. THIS STEP IS OPTIONAL!
Thank you for watching Mass Appeal! If you have any craft ideas you would like us to demo on the show for you, just email me at:
[email protected]
Happy Crafting!
Big Hugs,
Malena
413-512-3714
Fancy That Antiques Cell Phone Line


